Showing posts with label Tutorial. Show all posts

Saturday, July 19, 2008

Creating Container-managed Entity Beans with JBoss and MyEclipse

3 comments
Delicious 0

Posted by Nguyen, Lam D


Introduction
An Entity Bean is an Enterprise JavaBean (EJB) that represents a persistent object in a relational database. JBoss provides two methods of entity bean persistence, Bean Managed Persistence (BMP) and Container-Managed Persistence (CMP). With BMP, the entity bean developer must implement all the persistence logic. With CMP, the application server manages entity bean persistence; the developer provides interfaces and configuration.
Entity JavaBeans that use container-managed persistence (CMP) are convenient, because they require so little custom code to achieve automatic persistence. But that convenience carries a price: beans using CMP are also ferociously complex to configure, and often difficult to debug.

Preparing
There're many ways to create EJB with CMP method. But, why we not make it simply by using MyEclipse? In this article, you will see how can i make an CMP in MyEclipse and Jboss step by step. So, you have to install pre-requirements to make it works. I'm using:
  • Eclipse 3.2.1 with MyEclipse 5.5.1 GA
  • Database MSSQL 2000 with services pack 3 (so easily config in tutorial), you can use any SQL server you want.
  • Java SE 5.0 with Update 10 (the old version of Java SE, lastest realease is
    Java SE 6 Update 10 Beta)
  • jboss-4.0.5.GA
You sould create a working directory where you install and store all related files. In this tutorial we'll use C:\Java as working directory. If you want to store it somewhere else, then you'll have to replace every occurence of "C:\Java" throughout the tutorial by the desired directory.

Download and install Java SE JDK
You can download the lastest version of Java SE JDK is Java SE 6 JDK in Java SE download page. I'm still using Java Se 5 JDK :D
  1. Pick the latest JDK without Java EE SDK and/or Netbeans. (so, we not need NetBean for whatever :D)
  2. Accept the License Agreement and click at Windows Offline Installation, Multi-language.
  3. You will get the file jdk-xxx-windows-i586-p.exe (xxx base on your version downloaded), save it to disk.
  4. Install the JDK and JRE in C:\Java\ .Default path for install is C:\Program Files\java. You should change to C:\java because when using command, you not need to add double quote to java path.
Download and install Eclipse 3.2 with MyEclipse 5.5.1 GA
Eclipse is fee :D. You should download the lastest Eclipse IDE package Eclipse IDE for Java EE Developers
  1. Surf to the Eclipse download page.
  2. Click at Eclipse IDE for Java EE Developers.
  3. Select a mirror and you will get the file eclipse-jee-ganymede-win32.zip, save it to disk.
  4. Extract the zip to your work directory.
Well, you can download one package include Eclipse and MyEclipse at MyEclipse Download Page by Accept License Agreement: Standard/Pro License and Blue Edition License. Please download Eclipse IDE 3.2.x same as my tutorial.
  1. See MyEclipse Enterprise Workbench 5.5.1 GA for Windows 98/2000/NT/XP/Vista (05/21/2007)
  2. Choose All In One Package if you want to install MyEclipse Full Package includes Eclipse or Plug-in if want MyEclipse Standalone.
  3. Install IDE or Plug-In.

Download jboss
Download lastest version of jboss if you want or jboss version 4.0.5 GA same as mine at JBoss Application Server Downloads
Extract the package to your work directory. Done.

Install Microsoft SQL Server with Services Pack 3 (or above)
If you installed MS SQL 2000 server, you have to install services pack 3 to work with JNDI Datasource. Download the services pack at MS SQL 2000 Server with Services Pack 3a download page.
Important: You must upgrade computers running Microsoft® Windows® XP to Windows XP Service Pack 1 before applying SQL Server 2000 Service Pack 3a.

Run and configure Eclipse
  1. The first time to start Eclipse, you must select work space for Eclipse. 
  2. On the welcome screen, click at the icon with the curved arrow at the right side: Go to the workbench
  3. In the top menu, go to Window » Preferences » Java » Installed JREs. Select the current JRE (it should automatically be the same as you have installed, but we not use jre as JRE Installed, should edit it to JDK directory, in this case, click jre which automatically add to Eclipse and Edit, point the directory to JDK installed directory, and it'll automatically known what directory where jre is. Now the source code of the Java SE API is available in Eclipse.
Integrate JBoss in Eclipse
In the top menu, go to Window » Preferences » MyEclipse » Application Servers » Jboss 4. Select Enable Jboss Server, select Jboss Home Directory, others field is default. Then select JDK, choose JDK you installed, click Apply, then Ok. Now Jboss is integrated in Eclipse.

On the Toolbar of Eclipse, click  and select JBoss server to start jboss. Default port of jboss is 8080(keep in mind), you can change it later. Once it is started, go to http://localhost:8080 (where 8080 is supposed to be the HTTP/1.1 port of Tomcat). You should get the default Jboss home page.

You can simply stop jboss server by click on

Create EJB project with CMP method
In the menu, click File » New » Project...In the New Project Dialog, select MyEclipse, then choose EJB Project:

Click next to continues. Then enter the EJB project details, i choose the name as "CMPTutorial", click finish.
Ok, you prepared an EJB project, now, to create new CMP method, right click on Project at Package Eplorer panel, select New »Other...Choose MyEclipse in Wizard Dialog and select EJB » Entity Bean, click next as image below

In Entity Bean Diaplog image above, you can see the red ellip. Note: the name of package must be end with ejb folder and the class name must be end with Bean. Example, if your package is "yourpackage" the entity bean must be in "yourpackage.ejb" and the name of class entity bean of yours is YourBean or AnythingBean....Access of the EJB can be Remote/Local or Both, i select Remote in order to access from outside EJB.

Click Finish.

The Entity Bean Class
The entity bean class contains the entity bean logic. However, with CMP, the entity class is abstract, because many of the methods are defined in the class but implemented by the container. Accessor methods must be both public and abstract and the name of every method defined in CMP must be exactly with database field name.
In database:

In Entity Bean class:
/**
* @ejb.interface-method view-type="both"
* @ejb.pk-field
* @ejb.persistence
* @jboss.persistence
* not-null = "true"
* auto-increment = "true"
* @jboss.sql-type
* type = "int"
* @jboss.jdbc-type
* type = "INTEGER"
* @return
*/
public abstract Integer getArticle_ID();
/**
* @ejb.interface-method view-type="both"
* @param article_ID
*/
public abstract void setArticle_ID(Integer article_ID);

/**

* @ejb.persistence-field
* @ejb.interface-method view-type="remote"
* @return
*/

public abstract String getArticle_title();

/**
* @ejb.interface-method view-type="both"
* @param article_title
*/
public abstract void setArticle_title(String article_title);

/**
* @ejb.persistence-field
* @ejb.interface-method view-type="remote"
* @return
*/
public abstract String getArticle_desc();

/**
* @ejb.interface-method view-type="both"
* @param article_desc
*/
public abstract void setArticle_desc(String article_desc);

/**
* @ejb.persistence-field
* @ejb.interface-method view-type="remote"
* @return
*/
public abstract String getArticle_content();

/**
* @ejb.interface-method view-type="both"
* @param article_content
*/
public abstract void setArticle_content(String article_content);
So, because in database, the primary field is article_ID, the getArticle_ID must be declared as pk-field and if it's auto-increment, you have to add @jboss.persistence with not-null="true" and auto-increment = "true". Each method getter in Entity Bean class have to be added in the top with the following: @ejb.persistence-field and @ejb.interface-method view-type="remote" and each method setter, must be: @ejb.interface-method view-type="both".

Add following codes into the top of class:

/**
*
* @ejb.bean name="Article"
* display-name="Name for Article"
* description="Description for Article"
* jndi-name="ejb/Article"
* type="CMP"
* cmp-version="2.x"
* view-type="remote"
* schema="ArticlesSchema"
* primkey-field="article_ID"
*           primkey-class="java.lang.Integer"
*
* @ejb.pk class = "java.lang.Integer" generate = "False"
*
* @jboss.unknown-pk class="java.lang.Integer"
* column-name="article_ID"
* jdbc-type="INTEGER"
* sql-type="int"
* auto-increment="true"
* @jboss.entity-command name="mssql-fetch-key"
*
* @ejb.finder query="SELECT OBJECT(b) FROM ArticlesSchema AS b"
* signature="java.util.Collection findAll()"
*
* @ejb.finder query="SELECT OBJECT(b) FROM ArticlesSchema AS b WHERE b.article_ID=?1"
* signature="java.util.Collection findByArticleId(java.lang.Integer article_ID)"
*
* @ejb.persistence table-name="Articles"
* @jboss.persistence table-name="Articles"
*/
public abstract class UsersCMPBean implements EntityBean {
External clients use an entity bean's home interface to create, remove, and find instances of the entity bean. In Entity Bean class defines the following methods:

  • Create. Creates an entity bean instance.

  • Remove. (required) Removes an entity bean instance.

  • Finder methods. Find one or more entity bean instances. Finder method names must start with "find" (which i've defined in the top of the class above). For a CMP entity bean, the finder method findByPrimaryKey must be defined, but with MyEclipse, findByPrimaryKey method will be automatically generated by XDoclet.

In Entity Bean class, search for ejbCreate() method, replace by:

public Integer ejbCreate(String article_title, String article_desc, String article_content) throws CreateException {
    setArticle_title(article_title);
    setArticle_desc(article_desc);
    setArticle_content(article_content);
    return null;
}
Becasue article_ID is primary field and it's auto-increment, so you not need to set Article_ID in ejbCreate. Note: ejbCreate() method must return to primary value type(in above, primary field is article_ID, and the value type is Integer, sql-type and jdbc-type are different).

Replace ejbPostCreate() method by:

public void ejbPostCreate(String article_title, String article_desc, String article_content) throws CreateException {
}
The entity Bean Provider may use the ejbPostCreate() to set the values of cmr-fields to complete the initialization of the entity bean instance. An ejbPostCreate() method executes in the same transaction context as the previous ejbCreate() method.

Add Standard EJB module to XDoclet project properties
To generate EJB related classes using XDoclet, you have to add Standard EJB module to XDoclet project properties. Right click on Project, click on Properties. Choose MyEclipse » XDoclet. In Configuration tab, click Add Standard..., select Standard EJB, click OK.


Customize XDoclet configuration
Right click on Standard EJB was defined above, choose Add(not Add Doclet), select jboss, click OK to add jboss entity.


You can customize XDoclet with some value in order to generate EJB related classes

  • deloymentDescription

    1. destDir :src/META-INF

    2. validateXML: true


  • fileset

    1. dir: src

    2. includes: **/*.java

  • jboss

    1. version: 4.0

    2. alterTable: false

    3. creatTable: false;

    4. datasource: java:/Articles

    5. datasourceMapping: MS SQLSERVER2000

    6. destDir :src/META-INF

Following entities are required, you can remove others.


Run XDoclet
We have not completely finished the source code, but it is time for a first generation with xdoclet.

Right click on the project and choose run xdoclet.


Create JNDN Datasource
Create new XML file and deploy(simply save XML file to Jboss directoryserverdefaultdeploy) with name: xxx-ds.xml and inlcudes following codes:

<datasources>
  <local-tx-datasource>
    <jndi-name>Articles</jndi-name>
    <connection-url>jdbc:microsoft:sqlserver://localhost:1433;DatabaseName=YourDatabase</connection-url>
    <driver-class>com.microsoft.jdbc.sqlserver.SQLServerDriver</driver-class>
    <user-name>username</user-name>
    <password>password</password>

    <metadata>
    <type-mapping>MS SQLSERVER2000</type-mapping>
    </metadata>
  </local-tx-datasource>
</datasources>

Deploy EJB to Jboss server
Right click in Project, select MyEclipse » Add and Remove Project Deployments... Following these steps below:

When completed, in console window announ that Bound EJB Home 'Article' to jndi 'ejb/Article'. That's all, you have created new EJB with CMP method successfully.
For the next article, i'll guide you how to access EJB with Java Application and Java Web Aplication
Best Rigard!

© 2008, Lam Duy Nguyen
Tuesday, July 15, 2008

Post form to clean, a tutorial with JSP/Servlet and JavaScript

0 comments
Delicious 0

Posted by Nguyen, Lam D


Rewritten URLs are valuable because they increase website usability and improve search engine optimisation (SEO), in PHP with mod_rewrite, you can rewrite URL easily and simple, when using java, you can too, just follow this article. Well, but we have a problem: HTML forms and rewrite URL were not designed to work together. So, you have to use client-side(java script) to transfer page to result page wich rewrited URL. However, you can do it by server-side script by pre-processing input from HTML Forms and transfer to result page. In this tutorial, i'll guide you how to make it work by 2 way: Client-side and Server-side.
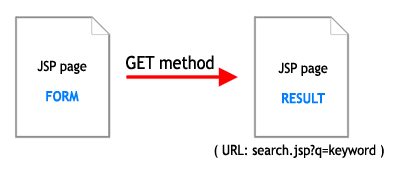
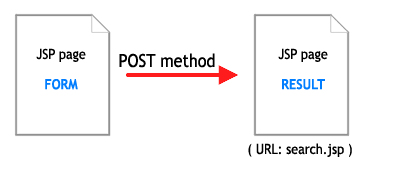
HTML forms only have two ways to pass variables to their target page: GET and POST methods.

POST Method:


Using POST method is sercured by empty URL in address bar. If the result page is result.jsp, URL when POST is only: result.jsp. Wow, nice URL, but, the visitor or user can not reuseable for this URL, and can not simply get the same value when re-access this URL. POST method is best for inserting record to database, but worth for searching or fetching records from HTML forms.

GET Method:


Forms using the GET method send data via the URL. This means that the URL can be copied and revisited at any time. The problem with this method is the format of the parameters. The values in the URL string are ugly, verbose and unfriendly; this is what we are trying to avoid. SEO with GET method is so bad. Almost search engineers like: Google, Yahoo, Live... not love URL generated by GET method.

The Client-Side Solution: Post by JavaScript to result page.
Using javascript with windows.location. In the HTML form, you will create new event for form. When the form is submitted, the function in javascript will be called and tranfer to new page. Script will be following codes:

function getKeyword(){
   q=document.getElementById('query').value;
   window.location = "http://localhost:8080/PostCleanTut/search/"+q;
}


document.getElementById('query').value used for getting value of textfiled inside your search form. After getting the keyword value, script will transfer you to result page(JSP/Servlet) which will be created and rewrited URL yourself. Now, create your new HTML Search form name as searchform.jsp, and it likes following codes:

<html> 
<head>
<title>Search Form</title>
</head>
<body>
     <form action="" onsubmit="getKeyword(); return false;" method="post" name="searchForm" id="searchForm">
        Query:
        <input type="text" name="query" id="query">
        <input type="submit" name="btnSubmit" id="btnSubmit" value="Submit">
     </form>
</body>
</html>
onsubmit="getKeyword(); return false;" used to call getKeyword() funtion from javacript. When done all thing above, submit your form, data posted will be transfered to result page with example address: http://localhost:8080/PostCleanTut/search/yourkeyword.


The Server-side Solution: Pre-processed by a servlet or JSP self page and send redirect to Result page.

Simply processing with a single jsp or a servlet, you can POST to self jsp page include HTML Form, then send redirect to another page which will be rewrited URL. So, in this article, i will do it with a servlet page by doPost() method. In the pre-processing servlet, doPost() method gets parameter from HTML form, you can clean up by removing unwanted characters. However, this article just do simply to explaint what the servlet do with posting form to clean.

Create your new servlet, name as: SearchProcess.java, codes will be:

package prlamnguyen.servlet;
import java.io.IOException;
import java.io.PrintWriter;
import javax.servlet.ServletException;
import javax.servlet.http.HttpServlet;
import javax.servlet.http.HttpServletRequest;
import javax.servlet.http.HttpServletResponse;
import prlamnguyen.util.StringUtil;
public class SearchProcess extends HttpServlet {
  /**
    * Constructor of the object.
    */
   public SearchProcess() {
      super();
   }

  /**
    * Pre-Processing of Search
    * @param request
    * @param response
    * @throws ServletException
    * @throws IOException
    */
   public void proccessRequest(HttpServletRequest request,
      HttpServletResponse response) throws ServletException, IOException {
      //Get parameter from HTML form
      String q = request.getParameter("query");

      // Clean up by removing unwanted characters if you want
      String newQ = StringUtil.searchInput(q);
      response.sendRedirect(request.getContextPath() + "/search/" + newQ);
   }
  /**
    * The doGet method of the servlet. <br>
    *
    * This method is called when a form has its tag value method equals to get.
    *
    * @param request the request send by the client to the server
    * @param response the response send by the server to the client
    * @throws ServletException if an error occurred
    * @throws IOException if an error occurred
    */
   public void doGet(HttpServletRequest request, HttpServletResponse response)
      throws ServletException, IOException {

      proccessRequest(request, response);

   }
  /**
    * The doPost method of the servlet. <br>
    *
    * This method is called when a form has its tag value method equals to post.
    *
    * @param request the request send by the client to the server
    * @param response the response send by the server to the client
    * @throws ServletException if an error occurred
    * @throws IOException if an error occurred
    */
   public void doPost(HttpServletRequest request, HttpServletResponse response)
     throws ServletException, IOException {

     proccessRequest(request, response);

   }
  /**
    * Initialization of the servlet. <br>
    *
    * @throws ServletException if an error occure
    */
   public void init() throws ServletException {
      // Put your code here
   }
}
Above is java class which pre-process and transfer, new servlet which will display result and url will be rewriten have to be created such as name Search.java. Note: you can do it simply by a single jsp to handle and display result, but with a servlet, you can handle data easily by doPost() or doGet() methods, so, it's reason i'm using servlet for this tutorial.

Searching in website is not simply like: where id=?, title=? or onething=?. You should use Full-text Searching, a full-text search allows a search of multiple text columns. If you are setting up a search of a series of articles or a site with lots of product-related content, a MySQL FULLTEXT search can make it very easy to find articles or products related to the keywords used by a searcher. This search method does exactly what its name implies–it allows a full search of large text fields. If you're new to Full-text Search, please follow this link to know how MySQL does with Full-text search.

Following codes bellows are written almost important steps to make search works with URL Rewriter, something like database connection, JNDI...please do it yourself.


Codes of Search.java:


package prlamnguyen.servlet;
/**
* @author Nguyen Duy Lam
*/
import java.sql.Connection;
import java.sql.PreparedStatement;
import java.sql.ResultSet;
import java.sql.SQLException;
import java.util.ArrayList;
import javax.naming.NamingException;
import javax.servlet.ServletContext;
import javax.servlet.ServletException;
import javax.servlet.http.HttpServlet;
import javax.servlet.http.HttpServletRequest;
import javax.servlet.http.HttpServletResponse;
import prlamnguyen.connector.PrlConnection;
import prlamnguyen.model.Article;
public class Search extends HttpServlet {


    Connection con = null;
    PreparedStatement prst = null;
    ResultSet rs = null;
    //Here is my Connection class
    // please create your one class to get connection or write it inside this servlet
    PrlConnection prlcon = null;

    /**
    * Constructor of the object.
    */
    public Search() {
       super();
    }

    /**
    *
    * @param request
    * @param response
    * @throws ServletException
    * @throws IOException
    */
    public void proccessRequest(HttpServletRequest request, HttpServletResponse response)
        throws ServletException, IOException {
        
        //Init my new connection
        prlcon = new PrlConnection();

        //Display articles in result list in result jsp page which will be created before
        try {
            //Get database connection
            con=prlcon.getConnection();
            //Prepare Statement with Full-text search query, i'm using MySQL.
            prst=con.prepareStatement("SELECT * FROM articles WHERE MATCH(article_title, article_desc, article_content) AGAINST (?)");
            //Get query parameter
            String keyword = request.getParameter("query");
            prst.setString(1, keyword);
            rs=prst.executeQuery();
            ArrayList<Article> articleList = new ArrayList<Article>();

            while(rs.next()){
                Article article = new Article(rs.getInt("article_ID"), rs.getString("article_title"), rs.getString("article_desc"), rs.getString("article_content"));
                articleList.add(article);
            }
            request.setAttribute("keyword", keyword);
            request.setAttribute("articles", articleList);
        } catch (ClassNotFoundException e) {
            
            e.printStackTrace();
        } catch (SQLException e) {
            
            e.printStackTrace();
        } catch (NamingException e) {
            
            e.printStackTrace();
        } finally {
            try {
                if(!con.isClosed()) {
                    con = prlcon.closeConnection(con, prst, rs);
                }
            } catch (SQLException e) {
                
                e.printStackTrace();
            }
        }

        ServletContext context = getServletContext();
        context.getRequestDispatcher("/result_search.jsp").forward(request, response);
    }


    /**
    * The doGet method of the servlet. <br>
    *
    * This method is called when a form has its tag value method equals to get.
    *
    * @param request the request send by the client to the server
    * @param response the response send by the server to the client
    * @throws ServletException if an error occurred
    * @throws IOException if an error occurred
    */
    public void doGet(HttpServletRequest request, HttpServletResponse response)
        throws ServletException, IOException {

        proccessRequest(request, response);

    }


    /**
    * The doPost method of the servlet. <br>
    *
    * This method is called when a form has its tag value method equals to post.
    *
    * @param request the request send by the client to the server
    * @param response the response send by the server to the client
    * @throws ServletException if an error occurred
    * @throws IOException if an error occurred
    */
    public void doPost(HttpServletRequest request, HttpServletResponse response)
        throws ServletException, IOException {
    
        proccessRequest(request, response);
    
    }


    /**
    * Initialization of the servlet. <br>
    *
    * @throws ServletException if an error occure
    */
    public void init() throws ServletException {
        // Put your code here
    }
}


To display data records, you have to have one data model class. Bellow is one use for above:


package prlamnguyen.model;
/**
* @author Nguyen Duy Lam
*/

public class Article {
    
   private int article_ID;
   private String article_title;
   private String article_desc;
   private String article_content;


   /**
   * @return the article_content
   */
   public String getArticle_content() {
       return article_content;
   }
    
   /**
   * @return the article_desc
   */
   public String getArticle_desc() {
       return article_desc;
   }
    
   /**
   * @return the article_ID
   */
   public int getArticle_ID() {
       return article_ID;
   }
    
   /**
   * @return the article_title
   */
   public String getArticle_title() {
       return article_title;
   }
    

   /**
   * @param article_content the article_content to set
   */
   public void setArticle_content(String article_content) {
       this.article_content = article_content;
   }
    
   /**
   * @param article_desc the article_desc to set
   */
   public void setArticle_desc(String article_desc) {
       this.article_desc = article_desc;
   }
    
   /**
   * @param article_ID the article_ID to set
   */
   public void setArticle_ID(int article_ID) {
       this.article_ID = article_ID;
   }
    
   /**
   * @param article_title the article_title to set
   */
   public void setArticle_title(String article_title) {
       this.article_title = article_title;
   }
    

   public Article() {

   }
    

   /**
   * Article model for search result
   * @param article_ID
   * @param article_title
   * @param article_desc
   */
   public Article(int article_ID, String article_title, String article_desc, String article_content) {
       this.article_ID=article_ID;
       this.article_title=article_title;
       this.article_desc=article_desc;
        this.article_content=article_content;
   }
}


Ok, almost important about bussiness logic are done, to be continue, create new JSP page to display search result. Search.java is a servlet, and when fetched data records, it forward to JSP result page name as result_search.jsp, you have to create this jsp page, something likes this:


<%@ page contentType="text/html; charset=utf-8" language="java" import="java.util.*" errorPage="" %>
<%@ page import="prlamnguyen.model.Article" %>

<%
    ArrayList articleList = null;
    Iterator iterator;
    Article article;

%>
<html>
<head>
<title>Result search page</title>
</head>
<body>
<p>Search result for: <strong><%=request.getAttribute("keyword") %></strong></p>
<%
    if(request.getAttribute("articles")!=null) {
        articleList = (ArrayList)request.getAttribute("articles");
        request.removeAttribute("articles");
        iterator = articleList.iterator();
        if(articleList.isEmpty()) {
            out.print("<i>Found nothing, sorry ^^!</i>");
        } else {
            out.print("<ul>");
            while ( iterator.hasNext() ) {
                article = (Article) iterator.next();
                out.print("<li><strong>" + article.getArticle_title() +"</strong><br />");
                out.print("<i>" + article.getArticle_desc() + "</i></li>");
            }
            out.print("</ul>");
        }
    }
%>
</body>
</html>


URL Rewrite


Follow this article to know how to rewrite URL in java, it will guide you step by step hwo to install URLRewriter and make it work in Java Web Application. When installed, insert into your urlrewrite.xml following codes to make URL rewrite work for search in this tutorial.

Add new rule somewhere between <urlrewrite>..</urlrewrite> tag

<rule enabled="true">
   <from>/search/([^/.]+)</from>
   <to>/search?query=
</to>
</rule>
All thing seem to be done, oh, please edit your HTML form. In the Client-side case, form was submitted by javascript, but in Server-side case, please remove onsubmit event, and point action of the form to "<%=request.getContextPath() %>/searchProcess". Example:

<%@ page language="java" pageEncoding="ISO-8859-1"%>

<html>
<head>
<title>Search Form</title>
</head>
<body>
     <form action="<%=request.getContextPath() %>/searchProcess" method="post" name="searchForm" id="searchForm">
        Query:
        <input type="text" name="query" id="query">
        <input type="submit" name="btnSubmit" id="btnSubmit" value="Submit">
     </form>
</body>
</html>
Ok, deploy your web application into web server, example url for testing will be http://localhost:8080/PostCleanTut/searchform.jsp
Note: when coding for a search, you have to handle data inputed from user, should replace Statement with PrepareStatement and set parameter for it to avoid SQL Injection
Best Rigard!
©2008 Lam Duy Nguyen

Saturday, June 28, 2008

Struts: Upload file using Struts and Generates unique ID for file name

0 comments
Delicious 0

Posted by Nguyen, Lam D


Someone finding the way to upload file with struts, it's simple...You only create form with Struts: Form class with file property is FormFile. But,..how to upload file to server with unique name in folder if some file has same name ???. Now, with this post, you'll resolve it, very simple!!!.

First, simply create your Struts form class, below is UploadFileForm, class extends ValidatorActionForm because i want to validate Form for uploading, class:

package prlamnguyen.struts.form;

import javax.servlet.http.HttpServletRequest;
import org.apache.struts.action.ActionMapping;
import org.apache.struts.upload.FormFile;
import org.apache.struts.validator.ValidatorActionForm;

/**
* Upload File Form Class.
*
* @author prlamnguyen
* @link http://prlamnguyen.blogspot.com/2008/06/upload-file-using-struts-and-generates.html
*/

public class UploadFileForm extends ValidatorActionForm {


/*
* Extends ValidatorActionForm if you want to validate form
*/

/** image property */
private String fileName;


/** fileImage property */
private FormFile file


/**
* @return the file
*/
public FormFile getFile() {
return file;
}


/**
* @return the fileName
*/
public String getFileName() {
return fileName;
}


/**
* @param file the file to set
*/
public void setFileImage(FormFile file){
this.file = file;
}


/**
* @param fileName the fileName to set
*/
public void setImage(String fileName) {
this.fileName = fileName;
}


/**
* Method validate
* @param mapping
* @param request
* @return ActionErrors
*/
public ActionErrors validate(ActionMapping mapping,
HttpServletRequest request) {
// Validate your form if you want
// This helpful for validate type of file, size, extension of file ....
return null;
}


/**
* Method reset
* @param mapping
* @param request
*/
public void reset(ActionMapping mapping, HttpServletRequest request) {
// Reset your form input
}

}


Above is UploadFileForm class, we have 2 properties: (String) fileName and (FormFile)file , with property file, you must import org.apache.struts.upload.FormFile which is struts capabilities, with MyEclipse 3.x or above, you can do that simply.


Now, we must create action class for struts, name of action class is UploadFileAction:


package prlamnguyen.struts.action;


import java.io.File;
import java.io.IOException;
import javax.servlet.http.HttpServletRequest;
import javax.servlet.http.HttpServletResponse;
import prlamnguyen.struts.form.UploadFileForm;

import org.apache.struts.action.Action;
import org.apache.struts.action.ActionForm;
import org.apache.struts.action.ActionForward;
import org.apache.struts.action.ActionMapping;
import org.apache.struts.upload.FormFile;


/**
* Creation date: 05-31-2008
*
* Upload File Action Class.
*
* @author prlamnguyen
* @link http://prlamnguyen.blogspot.com/2008/06/upload-file-using-struts-and-generates.html
*
* Definition:
* @struts.action path="/uploadFile" name="uploadFileForm" input="/upload_file.jsp" scope="request" validate="true"
* @struts.action-forward name="failed" path="/upload_file.jsp"
* @struts.action-forward name="success" path="/upload_successful.jsp"
*/
public class UploadFileAction extends Action {
/*
* Generated Methods
*/


/**
   *
   * @param uploadForm
   * @return
   */
public String uploadFile(UploadFileForm uploadForm) {
// Process the FormFile
FormFile myFile = uploadForm.getFile();
String fileName="default";
// Get the file name
try {
// Precreate an unique file and then write the InputStream of the uploaded file to it.
File uniqueFile = DoFile.uniqueFile(new File("your file patch"), myFile.getFileName());
DoFile.write(uniqueFile, myFile.getInputStream());
fileName = uniqueFile.getName();

// Show succes message.
System.out.println("Upload file complete");

} catch (IOException e) {

// Show error message.
System.out.println("Upload file failed");

// Always log stacktraces.
e.printStackTrace();
}
return fileName;
}

/**
   * Method execute
   * @param mapping
   * @param form
   * @param request
   * @param response
   * @return ActionForward
   */
public ActionForward execute(ActionMapping mapping, ActionForm form,
HttpServletRequest request, HttpServletResponse response) {
UploadFileForm uploadForm = (UploadFileForm) form;
       // to do execute
ActionForward forward = new ActionForward();

image = uploadImage(uploadForm);


return forward = mapping.findForward("success");
}
}


Ukie, all important thing done, DoFile above is one class file you must declare, and Struts must be config-ed:


  • DoFile Class:


/**
* Generate unique file based on the given path and name. If the file exists, then it will
* add "[i]" to the file name as long as the file exists. The value of i can be between
* 0 and 2147483647 (the value of Integer.MAX_VALUE).
* @param filePath The path of the unique file.
* @param fileName The name of the unique file.
* @return The unique file.
* @throws IOException If unique file cannot be generated, this can be caused if all file
* names are already in use. You may consider another filename instead.
*/
public static File uniqueFile(File filePath, String fileName) throws IOException {
File file = new File(filePath, fileName);
if (file.exists()) {
     // Split filename and add braces, e.g. "name.ext" --> "name[", "].ext".

        String prefix;
        String suffix;
  int dotIndex = fileName.lastIndexOf(".");


   if (dotIndex > -1) {
            prefix = fileName.substring(0, dotIndex) + "[";
            suffix = "]" + fileName.substring(dotIndex);
        } else {
            prefix = fileName + "[";
            suffix = "]";
        }
       int count = 0;
  // Add counter to filename as long as file exists.

       while (file.exists()) {

   if (count < 0) { // int++ restarts at -2147483648 after 2147483647.
   throw new IOException("No unique filename available for " + fileName
                                   + " in path " + filePath.getPath() + ".");
    }
    // Glue counter between prefix and suffix, e.g. "name[" + count + "].ext".
    file = new File(filePath, prefix + (count++) + suffix);

        }
}

return file;
}

/**
* Write byte inputstream to file. If file already exists, it will be overwritten.It's highly
* recommended to feed the inputstream as BufferedInputStream or ByteArrayInputStream as those
* are been automatically buffered.
* @param file The file where the given byte inputstream have to be written to.
* @param input The byte inputstream which have to be written to the given file.
* @throws IOException If writing file fails.
*/
public static void write(File file, InputStream input) throws IOException {
write(file, input, false);
}


<form-beans >
<form-bean name="UploadFileForm" type="prlamnguyen.struts.form.UploadFileForm" />
</form-beans>

<action-mappings >
<action
attribute="uploadForm"
input="/upload_file.jsp"
name="uploadFileForm"
path="/uploadFile"
scope="request"
type="prlamnguyen.struts.action.UploadFileAction">
<forward name="failed" path="/upload_file.jsp" />
<forward name="success" path="/upload_successful.jsp" />
</action>
</action-mappings>


Done, finish is create new JSP page and create Struts Form JSP, to upload your file, form with property: file.


Now, use any edit program, create new jsp file, here i create upload_file.jsp (for input and forward failed) :

<html:form action="/uploadFile" enctype="multipart/form-data">
<table width="100%" border="0" cellspacing="0" cellpadding="0">
 <tr>
   <td class="spectd">Chose file to upload: </td>
   <td><html:file property="file"/> <html:errors property="file"/></td>
 </tr>
</table>
<div align="center">
 <html:submit/>&nbsp;&nbsp;<html:reset/>
</div>
</html:form>


Note: you must have enctype="multipart/form-data" to send request upload file to server.

You should create successful page to print out when upload successful. In struts config, i created config-forward "success" with upload_successful.jsp jsp page.

If you done everything above, all classes were created, build all and deploy into your server and testing from url: http://localhost:8080/UploadFile/upload_file.jsp.

All wrong please email prlam.nguyen@gmail.com or comment here.
Regard!

© 2008, Lam Duy Nguyen

Friday, February 2, 2007

Struts: Validate form with Struts Validation

0 comments
Delicious 0

Posted by Nguyen, Lam D


When using Struts, you can easily validate datas before excute. So many way to validate the form with Struts, you can use JavaScripts, XML validator...many, many way to validate them...This article is not a new way for this, but it's simple to use if you're not sure about use javascript or other way.
Before use validating, you must sure that you can create the Struts form. If not, read following article, it's a tutorial how to Create Basic Struts Form.
First, you have to understand that Struts Validation will only work if your form-bean extends org.apache.struts.validator.ValidatorActionForm. So, your form which be validated, will looks like:

public class ExampleForm extends ValidatorActionForm {

    ...

}


Following lines belows are code of form-bean in this aticle:


package prlamnguyen.struts.form;

import javax.servlet.http.HttpServletRequest;
import org.apache.struts.action.*;
import org.apache.struts.validator.ValidatorActionForm;


/**
* @author Nguyen, Lam Duy
* @link http://prlamnguyen.blogspot.com/2007/02/java-tutorial-validate-form-with-struts.html
*/

/**
* Form bean for the Struts Validation Example.
*
*/

public class ExampleForm extends ValidatorActionForm
{
   private String name=null;
   private String emailAddress=null;

   public void setName(String name){
      this.name=name;
   }

   public String getName(){
      return this.name;
   }


   public void setEmailAddress(String emailAddress){
      this.emailAddress=emailAddress;
   }

   public String getEmailAddress(){
      return this.emailAddress;
   }


   /**
   * Reset all properties to their default values.
   *
   * @param mapping The mapping used to select this instance
   * @param request The servlet request we are processing
   */

   public void reset(ActionMapping mapping, HttpServletRequest request) {
      this.name=null;
      this.emailAddress=null;
   }

   /**
   * Validate form input before excuted.
   *
   * @param mapping The mapping used to select this instance
   * @param request The servlet request we are processing
   * @return errors
   */

   public ActionErrors validate(
       ActionMapping mapping, HttpServletRequest request ) {
       ActionErrors errors = new ActionErrors();

      if( getName() == null || getName().length() < 1 ) {
          errors.add("name",new ActionMessage("error.name.required"));
       }
      if( getEmailAddress() == null || getEmailAddress().length() < 1 ) {
          errors.add("emailaddress",new ActionMessage("error.emailAddress.required"));
       }

      return errors;
   }

}


The above class populates the Example Form data and validates it. The validate() method is used to validate the inputs. If any or all of the fields on the form are blank, error messages are added to the ActionMapping object. In Struts 1, ActionError seem to be deprecated and will be removed in Struts 2, so, i'm now using ActionMessage in this article. Ok, for the next, you must create a new Action class for Struts, because of form-bean's name is ExampleForm, Action class must be named as ExampleAction and extends org.apache.struts.action.Action. Form-bean above is Model of web struts application and the action class is Controller. I'll not guide to create an Action class, the previous post, i had created one, see here, config Struts is so easy and it was posted in that post.


Application Resources


An importance when using Struts to validate form is display error messages. Ignore everything about Controller and Struts Config, i'll explaint how to display error messages. First, you have to create ApplicationResources file in Struts Package, in my post, i packaged my model as "prlamnguyen.struts.form", so ApplicationResources will be in "prlamnguyen.struts" with name ApplicationResources.properties.


  • ApplicationResources.properties

# Resources for parameter 'prlamnguyen.struts.ApplicationResources'

# Project Example Struts Validation

# This will appear before each individual error.

errors.prefix=<span class="errors">

# This will appear after each individual error.

errors.suffix=</span><br />
errors.name.required=Name is required.

errors.emailAddress.required=Email Address is required.
Now, create a jsp file to input data. Note, when displaying error messages in jsp page, you can display individual or group error messages. If individual, add property value for each <html:errors /> else if group errors, only thing to do is adding <html:errors /> to anywhere you want to display error messages.

  • Individual

<%@ page language="java" pageEncoding="ISO-8859-1"%>
<%@
taglib uri="http://jakarta.apache.org/struts/tags-bean" prefix="bean"%>
<%@
taglib uri="http://jakarta.apache.org/struts/tags-html" prefix="html"%>


<html>
<head>
<title>
JSP for ExampleForm form</title>
</head>
<body>
   <html:form
action="/example">
      Name : <html:text property="name"/><html:errors property="name"/><br/>
      Email Address : <html:text property="emailAddress"/><html:errors property="emailAddress"/><br/>
      <html:submit/><html:cancel/>
   </html:form>
</body>

</html>
  • Group

<%@ page language="java" pageEncoding="ISO-8859-1"%>
<%@
taglib uri="http://jakarta.apache.org/struts/tags-bean" prefix="bean"%>
<%@
taglib uri="http://jakarta.apache.org/struts/tags-html" prefix="html"%>

<html>
<head>
<title>
JSP for ExampleForm form</title>
</head>
<body>

   <html:errors />


   <html:form
action="/example">
      Name : <html:text property="name"/><br/>
      Email Address : <html:text property="emailAddress"/><br/>
      <html:submit/><html:cancel/>
   </html:form>
</body>

</html>
Deploy your project and test with example URL: http://localhost:8080/WebTutorial/form/example.jsp


Screen when do nothing is:

Screen when validate() method was excuted

and Group Error Messages

Validation in Struts is so easy, right ^^ ?

Wednesday, January 31, 2007

Struts: The basic Web Struts Application

0 comments
Delicious 0

Posted by Nguyen, Lam D


Before read this article, be sure you know What is the Strusts Framework?
So, this article will explaint how to build an simple Web Struts Application?. It have many program support easily-build-int
Struts such as: MyEclipse, NetBean ... But, the basic guide for building Struts is very helpful for new to Struts and Java programming. This example will help you understand Struts in detail. I'll create new user interface to accept Name and Email address from user-input. In this case, form input was create with a basic JSP template called input.jsp and the success page will be success.jsp. Action class is just forwarding it to the sucess.jsp.

Action Form for struts (MODEL).


So, what's ActionForm? It's JavaBean that extends org.apache.struts.action.ActionForm. This bean will be maintains the session state for web application, data input from form at client-side will be automatically added as the object in server-side. In this case, i'll create new ActionForm name as GuestForm.java
  • GuestForm.java
package prlamnguyen.struts.form;

import javax.servlet.http.HttpServletRequest;
import org.apache.struts.action.*;


/**
* @author Nguyen, Lam Duy
* @link http://prlamnguyen.blogspot.com/2007/02/java-tutorial-basic-web-struts.html
*/


/**
* Form bean for the Guest entry.
*
*/

public class GuestForm extends ActionForm
{
private String name=null;
private String emailAddress=null;

public void setName(String name){
this.name=name;
}

public String getName(){
return this.name;
}

public void setEmailAddress(String emailAddress){
this.emailAddress=emailAddress;
}

public String getEmailAddress(){
return this.emailAddress;
}


/**
* Reset method will be used for reseting all data to default is null.
*
* @param mapping The mapping used to select this instance
* @param request The servlet request we are processing
*/

public void reset(ActionMapping mapping, HttpServletRequest request) {
this.name=null;
this.emailAddress=null;
}

/**
* Validate method to vailde the data inputed from form at client-side. It's be
* excute at Server-side. Set return to null if you not want to validate the
* form input
*
* @param mapping The mapping used to select this instance
* @param request The servlet request we are processing
* @return errors
*/

public ActionErrors validate(
ActionMapping mapping, HttpServletRequest request ) {
//In this case, i'll not validate form, i want this article simply
//The validate form for struts will be posted later.

return null;
}

}


Action Class for Struts (Controller)


Next step, create Action class, Action class is a Controller which receives the request, looks up the mapping for this request, and forwards it to an action. I'll create new class file name GuestAction.java which simply forward the request the success.jsp.

  • GuestAction.java

package prlamnguyen.struts.action;


import javax.servlet.http.HttpServletRequest;
import javax.servlet.http.HttpServletResponse;

import org.apache.struts.action.Action;
import org.apache.struts.action.ActionForm;
import org.apache.struts.action.ActionForward;
import org.apache.struts.action.ActionMapping;


/**
* @author Nguyen, Lam Duy
* @link http://prlamnguyen.blogspot.com/2007/02/java-tutorial-basic-web-struts.html
*/

public class AddressAction extends Action
{
 /**
 * Method execute
 * @param mapping
 * @param form
 * @param request
 * @param response
 * @return ActionForward
 * @throws Exception
 */

public ActionForward execute(ActionMapping mapping, ActionForm form,
HttpServletRequest request, HttpServletResponse response) throws Exception{
ActionForward forward = new ActionForward();
forward = mapping.findForward("success");
return forward;
}
}
Now, create config file for Struts, default name for struts config file is struts-config.xml. Add the following lines in the struts-config.xml file:

  • struts-config.xml

<?xml version="1.0" encoding="UTF-8"?>
<!DOCTYPE struts-config PUBLIC "-//Apache Software Foundation//DTD Struts Configuration 1.2//EN"
"http://struts.apache.org/dtds/struts-config_1_2.dtd">
<struts-config>


...


 <!--
Define form-bean class.
-->


<form-beans >
<form-bean
name="guestForm" type="prlamnguyen.struts.form.GuestForm" />
</form-beans>


...

<action-mappings >

 <!--
These line below for handling the action "/guestInput.do".
-->

<action

attribute="guestForm"
input="/input.jsp"
name="guestForm"
path="/guestInput"
scope="request"
     validate="false"
type="prlamnguyen.struts.action.GuestAction">

<forward
name="success" path="/success.jsp" />
</action>
</action-mappings>

...

</struts-config>


The action *.do have to define in web.xml. Add following code into web.xml file. This step can be ignored when you use MyEclipse or NetBean ... to add Struts. In this case, i'll do it for you.


  • web.xml

<?xml version="1.0" encoding="UTF-8"?>
<web-app xmlns="http://java.sun.com/xml/ns/j2ee"
          
xmlns:xsi="http://www.w3.org/2001/XMLSchema-instance"
          
version="2.4" xsi:schemaLocation="http://java.sun.com/xml/ns/j2ee
          http://java.sun.com/xml/ns/j2ee/web-app_2_4.xsd"
>


...


 <!--
Add these line for using struts in web application,
    default code can be generated by other program such as: MyEclipse, NetBean....
-->

<servlet>
<servlet-name>
action</servlet-name>
<servlet-class>
org.apache.struts.action.ActionServlet</servlet-class>
<init-param>
<param-name>
config</param-name>
<param-value>
/WEB-INF/struts-config.xml</param-value>
</init-param>
<init-param>
<param-name>
debug</param-name>
<param-value>
3</param-value>
</init-param>
<init-param>
<param-name>
detail</param-name>
<param-value>
3</param-value>
</init-param>
<load-on-startup>
0</load-on-startup>
</servlet>


...


<servlet-mapping>
<servlet-name>
action</servlet-name>
<url-pattern>
*.do</url-pattern>
</servlet-mapping>


...


</web-app>
JSP for input and Display (VIEW).


Last, create the new jsp page for form input which is our form for entering the details and jsp page for success message, in Struts Config, input-form file was defined as input.jsp and success page is success.jsp.

  • input.jsp

<html:form action="/guestInput">
<table width=
"100%" border="0" cellspacing="0" cellpadding="0">
<tr>
<td>
Name:</td>
<td><html:text property=
"name"/></td>
</tr>
<tr>
<td>
Email Address:</td>
<td><html:text property=
"emailAddress"/></td>
</tr>
</table>
<div align=
"center">
<html:submit/>
&nbsp;&nbsp;<html:reset/>
</div>
</html:form>
  • success.jsp

  <%@ page language="java" contentType="text/html; charset=ISO-8859-1"
pageEncoding="ISO-8859-1"%>
<html>
<head>

<title>
Success</title>
</head>
<body>
       
Input successful !

 </body>
 </html>  
Correct me if I'm wrong.

Regard!

© Nguyen, Duy Lam 2008